Android资源学习(二)资源管理系统初始化
本文源码基于Android9.0
前言
这篇文章的目的,主要是专注于Android中在Java层中资源管理系统的初始化,在日常开发中,经常会用到getResources.getXXX,所以说明Resource肯定在某个时机进行的初始化,然后把aapt编译的资源加载进来,
而getResources的起源就是ContextImpl里的mResources,所以源码起源就是ContextImpl的初始化了
# ContextImpl-> createActivityContext
static ContextImpl createActivityContext(ActivityThread mainThread,
            LoadedApk packageInfo, ActivityInfo activityInfo, IBinder activityToken, int displayId, Configuration overrideConfiguration) {
        // ...
        ContextImpl context = new ContextImpl(null, mainThread, packageInfo, activityInfo.splitName,activityToken, null, 0, classLoader, null);
        final ResourcesManager resourcesManager = ResourcesManager.getInstance();
        context.setResources(resourcesManager.createBaseActivityResources(activityToken,
                packageInfo.getResDir(),
                splitDirs,
                packageInfo.getOverlayDirs(),
                packageInfo.getApplicationInfo().sharedLibraryFiles,
                displayId,
                overrideConfiguration,
                compatInfo,
                classLoader));
        // ...
        return context;
 }
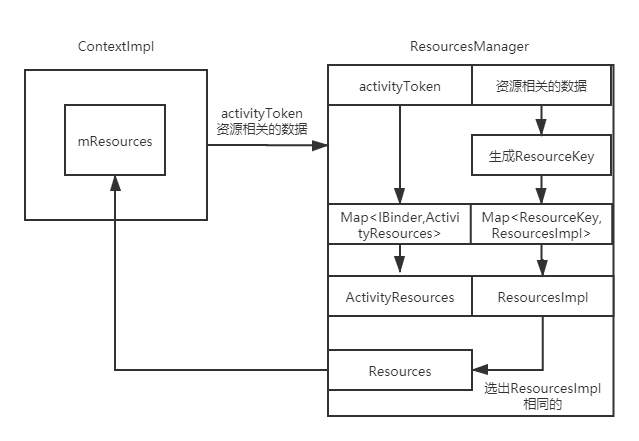
直接new出一个ContextImpl对象并且getInstance拿到ResourcesManager对象,然后创建Resources的工作会委托给单例对象ResourceManager,然后ComtextImpl会把ResourceManager创建的Resources保存在成员变量mResources中
# ResourcesManager-> createBaseActivityResources
public @Nullable Resources createBaseActivityResources(@NonNull IBinder activityToken,
            @Nullable String resDir,
            @Nullable String[] splitResDirs,
            @Nullable String[] overlayDirs,
            @Nullable String[] libDirs,
            int displayId,
            @Nullable Configuration overrideConfig,
            @NonNull CompatibilityInfo compatInfo,
            @Nullable ClassLoader classLoader) {

            final ResourcesKey key = new ResourcesKey(
                    resDir,
                    splitResDirs,
                    overlayDirs,
                    libDirs,
                    displayId,
                    overrideConfig != null ? new Configuration(overrideConfig) : null, // Copy
                    compatInfo);
            classLoader = classLoader != null ? classLoader : ClassLoader.getSystemClassLoader();
            synchronized (this) {
                // Force the creation of an ActivityResourcesStruct.
                getOrCreateActivityResourcesStructLocked(activityToken);
            }

            updateResourcesForActivity(activityToken, overrideConfig, displayId,
                    false /* movedToDifferentDisplay */);
            return getOrCreateResources(activityToken, key, classLoader);
        }
    }
基于所有的资源目录、显示屏id等信息配置生成一个ResourcesKey
调用getOrCreateActivityResourcesStructLocked方法创建一个ActivityResourcesStruct添加到缓存中
调用updateResourceForActivity方法用overideConfig更新缓存中的ActivityResourceStruct
# ActivityResources结构
private static class ActivityResources {
        @UnsupportedAppUsage
        private ActivityResources() {
        }
        public final Configuration overrideConfig = new Configuration();
        public final ArrayList<WeakReference<Resources>> activityResources = new ArrayList<>();
}
可见,其实ActivityResources就是与某个Activity相关的Resources集合以及配置信息的封装
# ResourcesManager-> getOrCreateActivityResourcesStructLocked
private ActivityResources getOrCreateActivityResourcesStructLocked(
            @NonNull IBinder activityToken) {
        ActivityResources activityResources = mActivityResourceReferences.get(activityToken);
        if (activityResources == null) {
            activityResources = new ActivityResources();
            mActivityResourceReferences.put(activityToken, activityResources);
        }
        return activityResources;
    }
判断成员变量mActivityResourceReferences中是否有与token匹配的ActivityResources
如果存在直接返回
如果不存在创建一个并添加到缓存中
# ResourcesManager-> updateResourcesForActivity
public void updateResourcesForActivity(@NonNull IBinder activityToken,
            @Nullable Configuration overrideConfig, int displayId,
            boolean movedToDifferentDisplay /* false */) {

            synchronized (this) {
                final ActivityResources activityResources =
                        getOrCreateActivityResourcesStructLocked(activityToken);

                if (Objects.equals(activityResources.overrideConfig, overrideConfig)
                        && !movedToDifferentDisplay/*false*/) {
                    // 如果activityResources中存的配置信息和传入的一致, 那就直接退出
                    return;
                }

                // 创建一个activityResources的旧的配置对象
                final Configuration oldConfig = new Configuration(activityResources.overrideConfig);

                // 更新activityResources中的配置对象
                if (overrideConfig != null) {
                    activityResources.overrideConfig.setTo(overrideConfig);
                } else {
                    activityResources.overrideConfig.unset();
                }

                final boolean activityHasOverrideConfig =
                        !activityResources.overrideConfig.equals(Configuration.EMPTY);

                // 重新设定与此Activity关联的每个资源的
                final int refCount = activityResources.activityResources.size();
                for (int i = 0; i < refCount; i++) {
                    WeakReference<Resources> weakResRef = activityResources.activityResources.get(
                            i);
                    // 获取Resources
                    Resources resources = weakResRef.get();
                    if (resources == null) {
                        continue;
                    }

                    // 根据Resource中ResourceImpl获取ResourceKey
                    final ResourcesKey oldKey = findKeyForResourceImplLocked(resources.getImpl());

                    // 构建一个内容与overrideConfig相同的配置对象
                    final Configuration rebasedOverrideConfig = new Configuration();
                    if (overrideConfig != null) {
                        rebasedOverrideConfig.setTo(overrideConfig);
                    }

                    // 先用旧的配置信息和新的配置信息生成差量信息
                    // 把差量信息设置到rebasedOverrideConfig中
                    if (activityHasOverrideConfig && oldKey.hasOverrideConfiguration()) {
                        Configuration overrideOverrideConfig = Configuration.generateDelta(
                                oldConfig, oldKey.mOverrideConfiguration);
                        rebasedOverrideConfig.updateFrom(overrideOverrideConfig);
                    }

                    // 基于新的配置信息生成新的ResourcesKey
                    final ResourcesKey newKey = new ResourcesKey(oldKey.mResDir,
                            oldKey.mSplitResDirs,
                            oldKey.mOverlayDirs, oldKey.mLibDirs, displayId,
                            rebasedOverrideConfig, oldKey.mCompatInfo);

                    ResourcesImpl resourcesImpl = findResourcesImplForKeyLocked(newKey);
                    if (resourcesImpl == null) {
                        resourcesImpl = createResourcesImpl(newKey);
                        if (resourcesImpl != null) {
                            mResourceImpls.put(newKey, new WeakReference<>(resourcesImpl));
                        }
                    }

                    if (resourcesImpl != null && resourcesImpl != resources.getImpl()) {
                        resources.setImpl(resourcesImpl);
                    }
                }
    }
这里的Configuration配置信息其实就是和resource.arsc中的Res_Config类似
而与ResourceImpl相关的函数是:
- findResourcesImplForKeyLocked
- createResourcesImpl
总结起来这个方法的主要作用是:
- 更新activityTokn对应的ActivityResources中的配置信息,然后由于ResourcesKey会由配置信息组成,因此需要更新所有ActivityResources中的ResourcesImpl对应的ResourcesKey
- 创建ResourceImpl并把它添加到ResourceKey和ResourceImpl的映射缓存中
# ResourcesManager-> getOrCreateResources
private @Nullable Resources getOrCreateResources(@Nullable IBinder activityToken,
            @NonNull ResourcesKey key, @NonNull ClassLoader classLoader) {
        synchronized (this) {
            if (activityToken != null) {
                // 应用层应用
                final ActivityResources activityResources =
                        getOrCreateActivityResourcesStructLocked(activityToken);
                ResourcesImpl resourcesImpl = findResourcesImplForKeyLocked(key);
                if (resourcesImpl != null) {
                    return getOrCreateResourcesForActivityLocked(activityToken, classLoader,
                            resourcesImpl, key.mCompatInfo);
                }
            } else {
                // 系统应用
                ResourcesImpl resourcesImpl = findResourcesImplForKeyLocked(key);
                if (resourcesImpl != null) {
                    return getOrCreateResourcesLocked(classLoader, resourcesImpl, key.mCompatInfo);
                }
            }

            ResourcesImpl resourcesImpl = createResourcesImpl(key);
            if (resourcesImpl == null) {
                return null;
            }

            mResourceImpls.put(key, new WeakReference<>(resourcesImpl));

            final Resources resources;
            if (activityToken != null) {
                resources = getOrCreateResourcesForActivityLocked(activityToken, classLoader,
                        resourcesImpl, key.mCompatInfo);
            } else {
                resources = getOrCreateResourcesLocked(classLoader, resourcesImpl, key.mCompatInfo);
            }
            return resources;
        }
    }
这里主要区分两种情况:
情况1:如果activityToken不为空,则说明是应用层的应用,执行步骤为
- 根据activityToken在缓存中获取ActivityResources
- 根据ResourcesKey在缓存中获取ResourceImp
- 调用getOrCreateResourcesForActivityLocked方法返回一个Resource对象
情况2:如果activityToken为空,则说明是系统应用,执行步骤为
- 少去情况1的第一不,直接执行步骤2、3
- 而ActivityResources的获取之后主要用于配置信息的处理
# ResourcesManager-> getOrCreateResourcesForActivityLocked
private @NonNull Resources getOrCreateResourcesForActivityLocked(@NonNull IBinder activityToken,
            @NonNull ClassLoader classLoader, @NonNull ResourcesImpl impl,
            @NonNull CompatibilityInfo compatInfo) {
        final ActivityResources activityResources = getOrCreateActivityResourcesStructLocked(
                activityToken);

        final int refCount = activityResources.activityResources.size();
        for (int i = 0; i < refCount; i++) {
            WeakReference<Resources> weakResourceRef = activityResources.activityResources.get(i);
            Resources resources = weakResourceRef.get();

            if (resources != null
                    && Objects.equals(resources.getClassLoader(), classLoader)
                    && resources.getImpl() == impl) {
                return resources;
            }
        }

        Resources resources = compatInfo.needsCompatResources() ? new CompatResources(classLoader)
                : new Resources(classLoader);
        resources.setImpl(impl);
        activityResources.activityResources.add(new WeakReference<>(resources));
        return resources;
    }
遍历ActivityResources中的Resources,找出ResourcesImpl相同的一项,找到就返回,假如找不到,就调用创建一个
# 小结
源码有点多有点乱,往下继续深挖之前,先组织和小结一下ContextImpl、Resources、ResourcesImpl、ResourcesManager的作用及关系
- 在ContextImpl初始化的时候会创建一个Resources对象并用成员变量mResources保存起来
- ContextImpl中的Resources的创建工作是委托给ResourceManager实现的
- 而ResourceManager则会创建根据ContextImpl传过来的信息(主要是资源目录, 显示id)生成ResourcesKey,这个ResourcesKey是用于作为ResourcesImpl缓存的索引
- 而ResourceManager还会根据ContextImpl传来的的activityToken创建一个ActivityResources,主要作用是保存与这个Activity相关的所有Resource以及配置信息
- 而从ResourcesManager向ContextImpl返回的Resource对象规则为:
- 通过activityToken获取Resource列表
- 遍历Resources列表拿到和ResourcesKey对应缓存中ResourcesImpl相同的一个
- 如果找不到就创建一个Resources绑定ResourcesImpl,并返回
而Resources是ResoucesImpl的代理,Resources所执行的操作都是交由ResourcesImpl来完成,除此之外Resources还管理着系统资源的接口,用于对外提供访问系统资源的方式
而在代码设计上这个部分有一个特点,那就是创建之后的对象都会放在缓存中,然后其他方法需要用到这些对象的时候只需要从缓存中获取就可以了
因此下面继续跟踪资源管理系统初始化就可以从ResourcesImpl的开始
# ResourcesManager-> createResourcesImpl
 private @NonNull ResourcesImpl createResourcesImpl(@NonNull ResourcesKey key) {
        final DisplayAdjustments daj = new DisplayAdjustments(key.mOverrideConfiguration);
        daj.setCompatibilityInfo(key.mCompatInfo);
        final AssetManager assets = createAssetManager(key);
        final DisplayMetrics dm = getDisplayMetrics(key.mDisplayId, daj);
        final Configuration config = generateConfig(key, dm);
        final ResourcesImpl impl = new ResourcesImpl(assets, dm, config, daj);
        return impl;
    }
# ResourcesManager-> createAssetManager
 protected @Nullable AssetManager createAssetManager(@NonNull final ResourcesKey key) {
        final AssetManager.Builder builder = new AssetManager.Builder();

        // resDir can be null if the 'android' package is creating a new Resources object.
        // This is fine, since each AssetManager automatically loads the 'android' package
        // already.
        if (key.mResDir != null) {
            try {
                builder.addApkAssets(loadApkAssets(key.mResDir, false /*sharedLib*/,
                        false /*overlay*/));
            } catch (IOException e) {
                Log.e(TAG, "failed to add asset path " + key.mResDir);
                return null;
            }
        }

        if (key.mSplitResDirs != null) {
            for (final String splitResDir : key.mSplitResDirs) {
                try {
                    builder.addApkAssets(loadApkAssets(splitResDir, false /*sharedLib*/,
                            false /*overlay*/));
                } catch (IOException e) {
                    Log.e(TAG, "failed to add split asset path " + splitResDir);
                    return null;
                }
            }
        }

        if (key.mOverlayDirs != null) {
            for (final String idmapPath : key.mOverlayDirs) {
                try {
                    builder.addApkAssets(loadApkAssets(idmapPath, false /*sharedLib*/,
                            true /*overlay*/));
                } catch (IOException e) {
                    Log.w(TAG, "failed to add overlay path " + idmapPath);

                    // continue.
                }
            }
        }

        if (key.mLibDirs != null) {
            for (final String libDir : key.mLibDirs) {
                if (libDir.endsWith(".apk")) {
                    // Avoid opening files we know do not have resources,
                    // like code-only .jar files.
                    try {
                        builder.addApkAssets(loadApkAssets(libDir, true /*sharedLib*/,
                                false /*overlay*/));
                    } catch (IOException e) {
                        Log.w(TAG, "Asset path '" + libDir +
                                "' does not exist or contains no resources.");
                        // continue.
                    }
                }
            }
        }

        return builder.build();
    }
AssetManager会把资源都加载进来,而从代码逻辑能看出来,主要加载的逻辑为:
- 调用loadApkAssets创建ApkAssets
- 把ApkAssets添加到AssetManager.Builder中,最后生成AssetManager
# ResourcesManager-> loadApkAssets
private @NonNull ApkAssets loadApkAssets(String path, boolean sharedLib, boolean overlay)
            throws IOException {
        final ApkKey newKey = new ApkKey(path, sharedLib, overlay);
        ApkAssets apkAssets = mLoadedApkAssets.get(newKey);
        if (apkAssets != null) {
            return apkAssets;
        }

        // Optimistically check if this ApkAssets exists somewhere else.
        final WeakReference<ApkAssets> apkAssetsRef = mCachedApkAssets.get(newKey);
        if (apkAssetsRef != null) {
            apkAssets = apkAssetsRef.get();
            if (apkAssets != null) {
                mLoadedApkAssets.put(newKey, apkAssets);
                return apkAssets;
            } else {
                // Clean up the reference.
                mCachedApkAssets.remove(newKey);
            }
        }

        if (overlay) {
            apkAssets = ApkAssets.loadOverlayFromPath(overlayPathToIdmapPath(path),
                    false /*system*/);
        } else {
            apkAssets = ApkAssets.loadFromPath(path, false /*system*/, sharedLib);
        }
        mLoadedApkAssets.put(newKey, apkAssets);
        mCachedApkAssets.put(newKey, new WeakReference<>(apkAssets));
        return apkAssets;
    }
根据资源的路径,shareLib,Overlay生成一个ApkKey
从mLoadedApkAssets中根据ApkKey获取一个ApkAssets,如果存在直接返回
如果上一步获取不成功,就会从mCachedApkAssets中根据ApkKey获取,如果存在,就添加到mLoadedApkAssets中并从mCachedApkAssets中移除,然后返回
如果缓存中没有就直接创建一个,然后添加到mLoadedApkAssets和mCachedApkAssets中
设计思想:
所有资源目录都会生成一个ApkAssets,然后做一个二级缓存
-
第一级缓存: mLoadedApkAssets保存这所有已经加载的了ApkAssets的强引用
-
第二级缓存: mCachedApkAssets保存这所有加载过的ApkAssets的弱引用
这种设计的目的就是把缓存拆分两部分:
- 活跃缓存: 活跃缓存持有强引用避免GC销毁
- 非活跃缓存:非活跃活跃缓存则持有弱引用,就算GC销毁了也不会有什么问题
# ApkAssets的加载
  @GuardedBy("this") private final long mNativePtr;
  @GuardedBy("this") private final StringBlock mStringBlock;

   public static @NonNull ApkAssets loadOverlayFromPath(@NonNull String idmapPath, boolean system)
            throws IOException {
        return new ApkAssets(idmapPath, system, false /*forceSharedLibrary*/, true /*overlay*/);
    }

    public static @NonNull ApkAssets loadFromPath(@NonNull String path, boolean system,
            boolean forceSharedLibrary) throws IOException {
        return new ApkAssets(path, system, forceSharedLibrary, false /*overlay*/);
    }

    public static @NonNull ApkAssets loadFromPath(@NonNull String path, boolean system)
            throws IOException {
        return new ApkAssets(path, system, false /*forceSharedLib*/, false /*overlay*/);
    }

    private ApkAssets(@NonNull String path, boolean system, boolean forceSharedLib, boolean overlay)
            throws IOException {
        mNativePtr = nativeLoad(path, system, forceSharedLib, overlay);
        mStringBlock = new StringBlock(nativeGetStringBlock(mNativePtr), true /*useSparse*/);
    }
ApkAssets可以通过两种方式创建:
- ApkAssets.loadOverlayFromPath 当apk使用到了额外重叠的资源目录对应的ApkAsset
- ApkAssets.loadFromPath 当apk使用一般的资源,比如的value资源,第三方资源库等创建对应的ApkAsset
ApkAssets的实际创建工作就委托给了Native层:
- 调用nativeLoad方法创建一个C++层的ApkAssets,然后只要用long把地址保存起来就可以了
- 调用nativeGetStringBlock初始化Java层的StringBlock,逻辑也类似
# android_content_res_ApkAssets.cpp-> NativeLoad
static jlong NativeLoad(JNIEnv* env, jclass /*clazz*/, jstring java_path, jboolean system,
                        jboolean force_shared_lib, jboolean overlay) {
  ScopedUtfChars path(env, java_path);
  // ......
  std::unique_ptr<const ApkAssets> apk_assets;
  if (overlay) {
    apk_assets = ApkAssets::LoadOverlay(path.c_str(), system);
  } else if (force_shared_lib) {
    apk_assets = ApkAssets::LoadAsSharedLibrary(path.c_str(), system);
  } else {
    apk_assets = ApkAssets::Load(path.c_str(), system);
  }

  if (apk_assets == nullptr) {
    // ......
    return 0;
  }
  return reinterpret_cast<jlong>(apk_assets.release());
}
这个native方法根据3种情况创建apk_assets:
- LoadOverlay 加载重叠资源
- LoadAsSharedLibrary 加载第三方库资源
- Load 加载一般的资源
重叠资源与我们平常的换肤不一样,输入framework层的资源包替换,如果想把Android相关资源替换掉,此时在overlay的文件夹中会包含这个apk,这个apk中只有资源没有dex,并且把相关能替换的id写在某个问价上,而在AssetManager初始化的时候就会根据这个id替换所有资源
# ApkAssets-> Load
static const std::string kResourcesArsc("resources.arsc");

std::unique_ptr<const ApkAssets> ApkAssets::Load(const std::string& path, bool system) {
  return LoadImpl({} /*fd*/, path, nullptr, nullptr, system, false /*load_as_shared_library*/);
}

std::unique_ptr<const ApkAssets> ApkAssets::LoadImpl(
    unique_fd fd, const std::string& path, std::unique_ptr<Asset> idmap_asset,
    std::unique_ptr<const LoadedIdmap> loaded_idmap, bool system, bool load_as_shared_library) {
  ::ZipArchiveHandle unmanaged_handle;
  int32_t result;
  // 1
  if (fd >= 0) {
    result =
        ::OpenArchiveFd(fd.release(), path.c_str(), &unmanaged_handle, true /*assume_ownership*/);
  } else {
    result = ::OpenArchive(path.c_str(), &unmanaged_handle);
  }
  // 用unique_ptr包裹handle,实现自动关闭
  std::unique_ptr<ApkAssets> loaded_apk(new ApkAssets(unmanaged_handle, path));

  // 2
  ::ZipString entry_name(kResourcesArsc.c_str());
  ::ZipEntry entry;
  result = ::FindEntry(loaded_apk->zip_handle_.get(), entry_name, &entry);
  if (result != 0) {
    // ......
    loaded_apk->loaded_arsc_ = LoadedArsc::CreateEmpty();
    return std::move(loaded_apk);
  }

  // 3
  loaded_apk->resources_asset_ = loaded_apk->Open(kResourcesArsc, Asset::AccessMode::ACCESS_BUFFER);
  loaded_apk->idmap_asset_ = std::move(idmap_asset);

  // 4
  const StringPiece data(
      reinterpret_cast<const char*>(loaded_apk->resources_asset_->getBuffer(true /*wordAligned*/)),
      loaded_apk->resources_asset_->getLength());
  loaded_apk->loaded_arsc_ =
      LoadedArsc::Load(data, loaded_idmap.get(), system, load_as_shared_library);

  return std::move(loaded_apk);
}
步骤1:如果有fd文件描述符则用调用OpenArchiveFd打开Zip文件,如果没有fd则调用OpenArchive打开Zip文件,总的来说说就是打开Zip文件
步骤2:通过FindEntry函数,寻找apk包中的resource.arsc文件
步骤3:读取apk包中的resource.arsc文件,读取里面包含的id相关的map,以及资源asset文件夹中
步骤4:生成StringPiece对象,通过LoadedArsc::Load读取其中的数据
# ApkAssets-> Open
std::unique_ptr<Asset> ApkAssets::Open(const std::string& path, Asset::AccessMode mode) const {
  CHECK(zip_handle_ != nullptr);

  ::ZipString name(path.c_str());
  ::ZipEntry entry;
  int32_t result = ::FindEntry(zip_handle_.get(), name, &entry);
  if (result != 0) {
    return {};
  }

  if (entry.method == kCompressDeflated) {
    std::unique_ptr<FileMap> map = util::make_unique<FileMap>();
    if (!map->create(path_.c_str(), ::GetFileDescriptor(zip_handle_.get()), entry.offset,
                     entry.compressed_length, true /*readOnly*/)) {
      // ......
      return {};
    }

    std::unique_ptr<Asset> asset =
        Asset::createFromCompressedMap(std::move(map), entry.uncompressed_length, mode);
    if (asset == nullptr) {
      // ......
      return {};
    }
    return asset;
  } else {
    std::unique_ptr<FileMap> map = util::make_unique<FileMap>();
    if (!map->create(path_.c_str(), ::GetFileDescriptor(zip_handle_.get()), entry.offset,
                     entry.uncompressed_length, true /*readOnly*/)) {
      // ......
      return {};
    }

    std::unique_ptr<Asset> asset = Asset::createFromUncompressedMap(std::move(map), mode);
    if (asset == nullptr) {
      // ......
      return {};
    }
    return asset;
  }
}
这个函数会把ZipEntry传进来,然后判断这个ZipEntry是否经过压缩:
- 如果经过压缩:
- 先通过FileMap把ZipEntry通过mmap映射到虚拟内存中
- 再通过Asset::createFromCompressedMap通过_CompressedAsset::openChunk拿到StreamingZipInflater,返回_CompressedAsset对象
- CompressedAsset是Asset的子类,在openChunk创建了StreamingZipInflater之后用成员变量保存起来,但是不会马上进行解压操作,而是等到第一次读操作执行
- 没有经过压缩:
- 通过FileMap把ZipEntry通过mmap映射到虚拟内存中
- 最后Asset::createFromUncompressedMap,返回FileAsset对象
resource.arsc并没有在apk中没有压缩,因此走的下面,直接返回对应的FileAsset
由这个逻辑可见,实际上对于压缩文件和非压缩文件,加载的流程类似,只不过压缩文件的加载,还需要记录一些和压缩相关的信息如:压缩文件的偏移量,长度,压缩后大小以及压 缩前大小等信息,然后里有加载过程中创建好的StreamingZipInflater在第一次读的时候进行解压操作
Android为了加速资源的加载速度,并不是直接通过File读写操作读取资源信息。而是通过FileMap的方式,也就是mmap把文件地址映射到虚拟内存中,时刻准备读写,这么做的好处,就是mmap回返回文件的地址,可以对文件进行操作,节省系统调用的开销,坏处就是mmap会映射到虚拟内存中,是的虚拟内存增大
# LoadedArsc-> Load
std::unique_ptr<const LoadedArsc> LoadedArsc::Load(const StringPiece& data,
                                                   const LoadedIdmap* loaded_idmap, bool system,
                                                   bool load_as_shared_library) {

  std::unique_ptr<LoadedArsc> loaded_arsc(new LoadedArsc());
  loaded_arsc->system_ = system;

  ChunkIterator iter(data.data(), data.size());
  while (iter.HasNext()) {
    const Chunk chunk = iter.Next();
    switch (chunk.type()) {
      case RES_TABLE_TYPE:
        if (!loaded_arsc->LoadTable(chunk, loaded_idmap, load_as_shared_library)) {
          return {};
        }
        break;
        // ......
    }
  }
  // ......
}
所有zip的chunk解析出来后,迭代寻找resource.arsc文件的标志头RES_TABLE_TYPE,也就arsc文件的头两个字节,然后执行的工作就是根据resources.arsc的文件结构把它读取出来,做成一个内存中的数据结构供后面使用
主要为LoadedArsc:
- gobal_string_pool_ 全局字符串资源池
- LoadedPackage package 数据对象
当解析完resources.arsc文件之后就会把地址返回给java层
# ApkAssers的加载
    private ApkAssets(@NonNull String path, boolean system, boolean forceSharedLib, boolean overlay)
            throws IOException {
        Preconditions.checkNotNull(path, "path");
        mNativePtr = nativeLoad(path, system, forceSharedLib, overlay);
        mStringBlock = new StringBlock(nativeGetStringBlock(mNativePtr), true /*useSparse*/);
    }
执行完了native层ApkAssets的创建,会再走一次native层,目标是拿到StringBlock
# android_content_res_ApkAssets.cpp-> NativeGetStringBlock
static jlong NativeGetStringBlock(JNIEnv* /*env*/, jclass /*clazz*/, jlong ptr) {
  const ApkAssets* apk_assets = reinterpret_cast<const ApkAssets*>(ptr);
  return reinterpret_cast<jlong>(apk_assets->GetLoadedArsc()->GetStringPool());
}
# LoadedArsc-> GetStringPool
inline const ResStringPool* GetStringPool() const {
    return &global_string_pool_;
 }
stringBlock的初始化其实就再走一次native层,把存在LoadedArsc中的global_string_pool_拿出来
此时ApkAssets就持有了两个native对象,一个是native层的ApkAssets,一个是native层的保存的arsc文件解析出来全局常量池
# AssetManager.Builder
public static class Builder {

   private ArrayList<ApkAssets> mUserApkAssets = new ArrayList<>();

   public AssetManager.Builder addApkAssets() {
       mUserApkAssets.add(apkAssets);
       return this;
   }

   public AssetManager build() {
       // Retrieving the system ApkAssets forces their creation as well.
       final ApkAssets[] systemApkAssets = getSystem().getApkAssets();

       final int totalApkAssetCount = systemApkAssets.length + mUserApkAssets.size();
       final ApkAssets[] apkAssets = new ApkAssets[totalApkAssetCount];

       System.arraycopy(systemApkAssets, 0, apkAssets, 0, systemApkAssets.length);

       final int userApkAssetCount = mUserApkAssets.size();
       for (int i = 0; i < userApkAssetCount; i++) {
            apkAssets[i + systemApkAssets.length] = mUserApkAssets.get(i);
       }

       // Calling this constructor prevents creation of system ApkAssets, which we took care
       // of in this Builder.
       final AssetManager assetManager = new AssetManager(false /*sentinel*/);
       assetManager.mApkAssets = apkAssets;
       AssetManager.nativeSetApkAssets(assetManager.mObject, apkAssets, false /*invalidateCaches*/);
       return assetManager;
    }
}
AssetManager的创建使用的是builder模式,流程为:
- 拿到管理系统资源的AssetManager,然后拿到其中ApkAsset数组
- 然后把系统资源的ApkAsset和应用自身的ApkAsset合并成一个新数组
- 然后就是直接new出一个AssetManager,把ApkAsset赋值给这个AssetManager
- 最后调用nativeSetApkAssets给native层的AssetManager2赋值
# AssetManager系统资源初始化
public static AssetManager getSystem() {
        synchronized (sSync) {
            createSystemAssetsInZygoteLocked();
            return sSystem;
        }
 }

private static void createSystemAssetsInZygoteLocked() {
        if (sSystem != null) {
            return;
        }

         final ArrayList<ApkAssets> apkAssets = new ArrayList<>();
         apkAssets.add(ApkAssets.loadFromPath("/system/framework/framework-res.apk", true /*system*/));
         loadStaticRuntimeOverlays(apkAssets);

         sSystemApkAssetsSet = new ArraySet<>(apkAssets);
         sSystemApkAssets = apkAssets.toArray(new ApkAssets[apkAssets.size()]);
         sSystem = new AssetManager(true /*sentinel*/);
         sSystem.setApkAssets(sSystemApkAssets, false /*invalidateCaches*/);
      }
  }
先构建一个静态的AssetManager,这个AssetManager只管理一个资源包/system/framework/framework-res.apk
然后调用loadStaticRuntimeOverlays方法根据 /data/resource-cache/overlays.list的复写资源文件,把需要重叠的资源覆盖在系统apk上
# AssetManager构造函数
private AssetManager(boolean sentinel) {
        mObject = nativeCreate();
 }
AssetManager的构造函数就是调用nativeCreate函数,而到了native层也只是直接new出对应的AssetManager2对象
# AssetManager2.cpp-> NativeSetApkAssets
把java层的数据转变成C++层的Vector,然后设置到AssetManager2中,当然Vector中的ApkAssets是指向C++层的实际对象
然后转调AssetManager2的SetApkAssets
# AssetManager2.cpp-> SetApkAssets
bool AssetManager2::SetApkAssets(const std::vector<const ApkAssets*>& apk_assets,
                                 bool invalidate_caches) {
  apk_assets_ = apk_assets;
  BuildDynamicRefTable();
  // ......
  return true;
}
BuildDynamicRefTable构建动态的资源引用表
RebuildFilterList构建过滤后的配置列表
InvalidateCaches刷新缓存
# AssetManager2-> BuildDynamicRefTable
std::vector<PackageGroup> package_groups_;

void AssetManager2::BuildDynamicRefTable() {
  package_groups_.clear();
  package_ids_.fill(0xff);

  // 0x01 is reserved for the android package.
  int next_package_id = 0x02;
  const size_t apk_assets_count = apk_assets_.size();
  for (size_t i = 0; i < apk_assets_count; i++) {
    const LoadedArsc* loaded_arsc = apk_assets_[i]->GetLoadedArsc();

    for (const std::unique_ptr<const LoadedPackage>& package : loaded_arsc->GetPackages()) {
      // Get the package ID or assign one if a shared library.
      // 1
      int package_id;
      if (package->IsDynamic()) {
        package_id = next_package_id++;
      } else {
        package_id = package->GetPackageId();
      }

      // 2
      // Add the mapping for package ID to index if not present.
      uint8_t idx = package_ids_[package_id];
      if (idx == 0xff) {
        package_ids_[package_id] = idx = static_cast<uint8_t>(package_groups_.size());
        package_groups_.push_back({});
        DynamicRefTable& ref_table = package_groups_.back().dynamic_ref_table;
        ref_table.mAssignedPackageId = package_id;
        ref_table.mAppAsLib = package->IsDynamic() && package->GetPackageId() == 0x7f;
      }
      PackageGroup* package_group = &package_groups_[idx];

      // Add the package and to the set of packages with the same ID.
      package_group->packages_.push_back(ConfiguredPackage{package.get(), {}});
      package_group->cookies_.push_back(static_cast<ApkAssetsCookie>(i));

      // 3
      // Add the package name -> build time ID mappings.
      for (const DynamicPackageEntry& entry : package->GetDynamicPackageMap()) {
        String16 package_name(entry.package_name.c_str(), entry.package_name.size());
        package_group->dynamic_ref_table.mEntries.replaceValueFor(
            package_name, static_cast<uint8_t>(entry.package_id));
      }
    }
  }

  // Now assign the runtime IDs so that we have a build-time to runtime ID map.
  const auto package_groups_end = package_groups_.end();
  for (auto iter = package_groups_.begin(); iter != package_groups_end; ++iter) {
    const std::string& package_name = iter->packages_[0].loaded_package_->GetPackageName();
    for (auto iter2 = package_groups_.begin(); iter2 != package_groups_end; ++iter2) {
      iter2->dynamic_ref_table.addMapping(String16(package_name.c_str(), package_name.size()),
                                          iter->dynamic_ref_table.mAssignedPackageId);
    }
  }
}
步骤1: 这里有点小坑,这里处于AssetManager2的所有apk_assers遍历之中,会从apk_assers中拿到之前构建时候解析好的LoadedArsc,然后从中拿出package,最后划分两种情况进行赋值给局部变量packageId:
- share library:这种情况下会在最开始创建ApkAssets的时候给标记为forceSharedLibrary为true,这种情况下,packageId会为0,所以需要从0x02开始给这个packageId赋值
- 一般的应用package,在解析的时候指定了packageId为0x7f,所以这个时候,packageId就是原来的load的时候指定的packageId,也就是0x7f
步骤2:由于给package_ids fill了初值0xff,所以代表了未初始化的情况,因此这一步其实就是对未初始化的package_ids进行初始化的操作:
- 这个时候会把package_group的大小赋值到package_ids中保存起来,package_group的size其实就是这个ApkAsset对应资源目录中的resources.arsc解析出来的所有package
- 然后还有一个操作就是对package_group中的DynamicRefTable进行初始化操作
- 然后就是根据当前循环次数构建一个cookie添加到package_group中,目前还不清楚这个cookie的作用?可能查找会用到??
步骤3:这一步是针对share library进行的处理,因为实际上在resources.arsc解析的过程中到了TYPE_LIBRARY会在package中保存一个dynamic_ref_table,其实也就是package_name和package_id的映射,然后在这一步中,会把这些数据交付给package_group了
步骤4:先拿到package_groups中第一个package的包名,以及运行时分配的递增式packageId,然后调用addMapping函数建立映射关系
解读:这一函数的方法名虽然叫buildDynamicRefTable,但是它的主要目的其实是为了吧Assets中的LoadedArsc中的package提取出来,移交给package_group,为什么要这么做呢?
因为全局常量池是单独存储的,所有读取速度不会慢的,但是相对于package的entry的读取,就慢得多了,所以package_group更像是一个缓存是实际数据的集合,怎么说?
把原来的LoadedArsc中的package提出来构建一个ConfiguraPackage,然后package_group只不过是这个ConfiguraPackage的承载集合而已
而ConfiguraPackage就可以根据配置信息去提前筛选出符合要求的typeSpec中的type,这样就可加快读取速度
# DynamicRefTable.cpp-> addMapping
private:
  uint8_t mLookupTable[256];
  KeyedVector<String16, uint8_t>  mEntries;

status_t DynamicRefTable::addMapping(const String16& packageName, uint8_t packageId) {
    ssize_t index = mEntries.indexOfKey(packageName);
    if (index < 0) {
        return UNKNOWN_ERROR;
    }
    mLookupTable[mEntries.valueAt(index)] = packageId;
    return NO_ERROR;
}
映射关系为:
mEntries中根据包名拿到一个value
mLookupTable[value]的就是运行时的packageId
所以经历这个步骤之后,我们只需要根据packageName,就可以从这两个容器中找到我们要运行时packageId了
# AssetManager2-> RebuildFilterList
void AssetManager2::RebuildFilterList() {
  for (PackageGroup& group : package_groups_) {
    for (ConfiguredPackage& impl : group.packages_) {
      // Destroy it.
      impl.filtered_configs_.~ByteBucketArray();

      // Re-create it.
      new (&impl.filtered_configs_) ByteBucketArray<FilteredConfigGroup>();

      // Create the filters here.
      impl.loaded_package_->ForEachTypeSpec([&](const TypeSpec* spec, uint8_t type_index) {
        FilteredConfigGroup& group = impl.filtered_configs_.editItemAt(type_index);
        const auto iter_end = spec->types + spec->type_count;
        for (auto iter = spec->types; iter != iter_end; ++iter) {
          ResTable_config this_config;
          this_config.copyFromDtoH((*iter)->config);
          if (this_config.match(configuration_)) {
            group.configurations.push_back(this_config);
            group.types.push_back(*iter);
          }
        }
      });
    }
  }
}
cached_bags_实际上缓存着过去生成过资源id,如果需要则会清除,一般这种情况如AssetManager配置发生变化都会清除一下避免干扰cached_bags
而这几个步骤的目的主要是为了让native层的AssetManager变相通过PackageGroup持有apk中的资源
# 总结
所有类的关系结构:
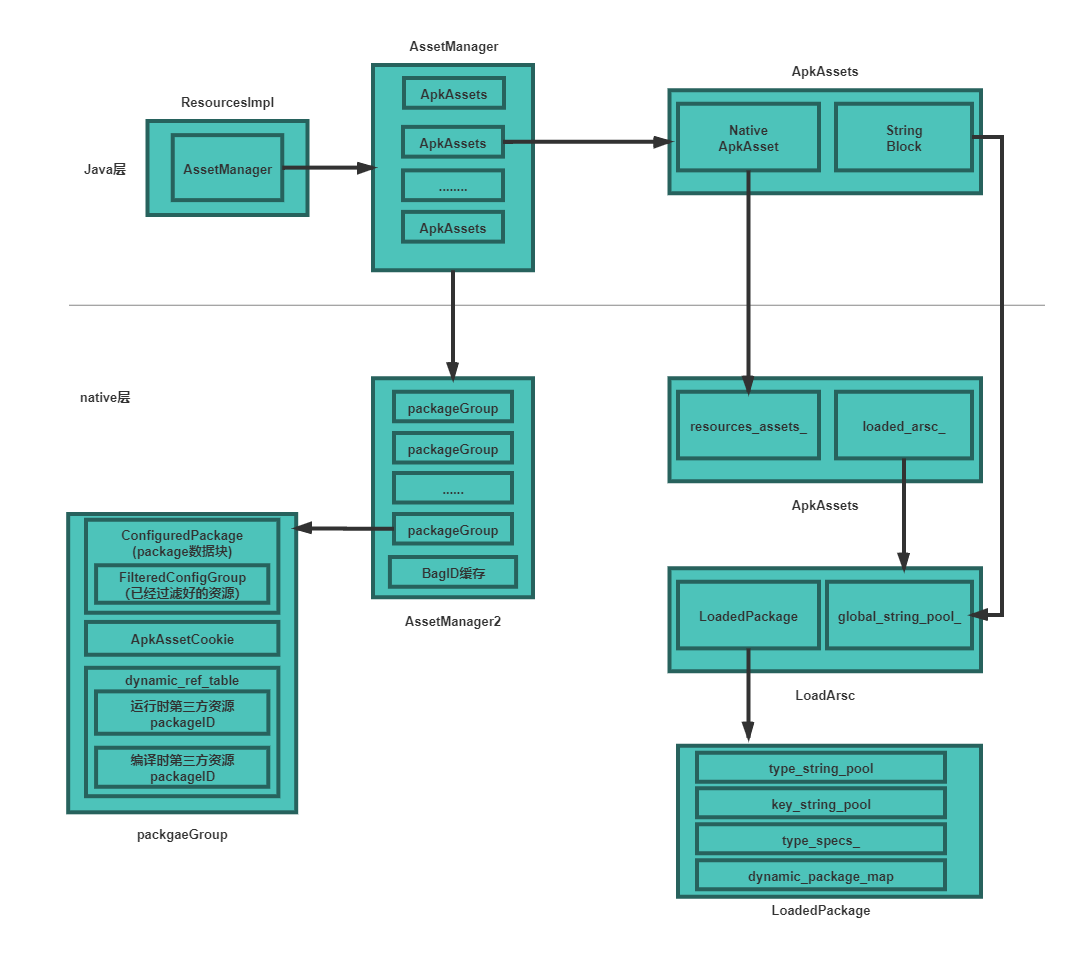
Java层
- ResourcesImpl是对外提供资源操作的Resources的真正实现,Resources只是一个代理
- ResourcesImpl中会有一个AssetManager,AssetManager用于维护一个列表存储并管理ApkAssets
- ApkAssets表示一个资源文件夹单位,数据及实现主要在native层,Java层维护两个指向native层的指针
C++层
-
ApkAssets表示一个资源文件单位,主要存储了resources.arsc资源文件映射对象及解析后数据结构,它包含两个重要的数据结构:
- resources_asset_ :象征着一个本质上是resources.arsc zip资源FileMap的Asset
- loaded_arsc_: ,一个LoadedArsc,是resource.arsc解析资源后生成的对象
-
LoadedArsc表示resources.arsc的解析数据结构,它包含两个重要的数据结构:
- global_string_pool_ 全局字符串资源池
- LoadedPackage package 数据对象
-
LoadedPackage里面有着大量的资源对象相关信息,以及真实数据,其中也包含几个很重要的数据结构:
- type_string_pool_ 资源类型字符串
- key_string_pool_ 资源项字符串
- type_specs_ 保存着所有资源类型和资源项的映射关系
- dynamic_package_map_ 保存第三方资源库的包名和packageId的映射关系
-
AssetManager2 Java层的AssetManager中存有AssetManager2的地址值,AssetManager2中也保存了ApkAssets的列表并对其维护,而AssetManager2还进行了优化:
-
保存着多个PackageGroup对象(内含ConfiguredPackage),里面包含着所有package数据块
-
构建动态资源表,放在package_group中,为了解决packageID运行时和编译时冲突问题
-
提前筛选出符合当前环境的资源配置到FilteredConfigGroup,为了可以快速访问
-
缓存已经访问过的BagID,也就是完整的资源ID
-
资源管理系统初始化中体现的Android读取优化措施:
- 在ResourcesManager中通过activityToken为Key缓存ActivityResources,缓存了该Activity所关联的所有的Resources对象的弱引用
- 在ResourcesManager中通过与资源相关信息封装成ResourcesKey作为Key,缓存ResourcesImpl的弱引用
- ApkAssets在内存中中的缓存,缓存拆成两部分,mLoadedApkAssets已经加载的活跃ApkAssets,mCacheApkAssets已经加载了但是不活跃的ApkAssets
- 为了能够快速查找符合当前环境配置的资源(屏幕密度,语言环境等),同样在过滤构建资源阶段,有一个FilteredConfigGroup对象,提供快速查找
- 缓存已经访问过的BagID,也就是完整的资源ID

参考资料:
Android应用程序资源管理器(Asset Manager)的创建过程分析
Android 重学系列 资源管理系统 资源的初始化加载(上)